Domibus v4.0.1 Admin Console Help
Admin Console GUI
Login
To login to the Administration Console, go to the console URL address.
Default location at http://localhost:8080/domibus/login (Tomcat example).
The version number of the Domibus/Administration Console is displayed at the bottom of the Login screen as shown below:

Connect to the administration console using the credentials of the administrator user (by default: user = admin; password = 123456).
After your first login with the admin credentials, you will be prompted to change the default password by the system.
It is highly recommended, for security reasons, to change the default admin user password.
After a successful logon the Messages page will be displayed:

Multitenancy and domain selection
In Multitenancy mode, each domain has its own set of configuration files including: Keystore, Truststore, PMode, Domain properties. Users are defined for each domain.
The super (supervisor) user has a ROLE_AP_ADMIN role with privileges to access all the available domains.
When logged as super, you are able to select a specific domain listed in a drop-down list in the upper right hand part of the admin console:

Left Sidebar Menu
The console's left sidebar menu provides a list of options available in the Administration Console, as shown below:

Hereafter, a brief description of each main menu items is given:
Messages
On this page, the administrator can see the details of the messages and re-process them if required. The administrator can also navigate through the messages history and download specific messages if needed.
Message Filter
On this page, the administrator can apply defined filters and access them individually.
Error Log
On this page, the administrator can view the list of application errors, perform searches on error messages and filter them.
PMode
On this page, the administrator can upload or download the PMde file. The administrator can also edit and modify directly the individual domain PMode.
JMS Monitoring
On this page, the administrator can monitor and manage the contents of the JMS queues.
Truststore
On this page, the administrator can upload a new truststore to replace the current one.
Users
On this page, the administrator can create and manage users including: grant access rights, change passwords, assign roles, etc.
Plugin Users
On this page, the administrator can manage the plugin users including: create, delete, edit, grant access rights, assign roles, etc.
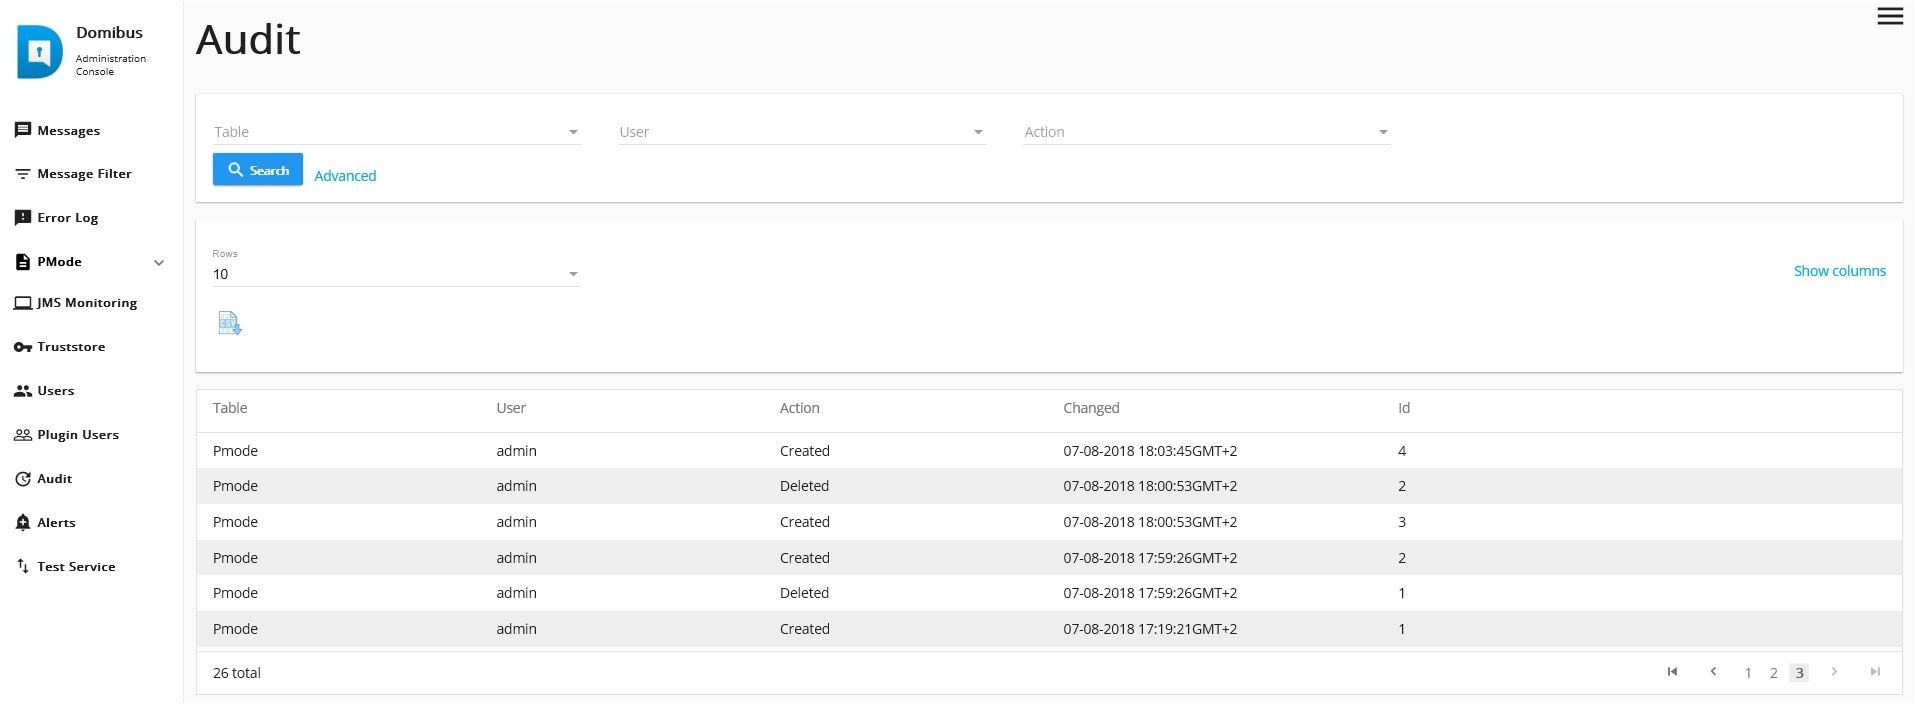
Audit
On this page, the administrator has an overview of changes performed in the PMode, Parties, Message Filter and Users pages.
Alerts
This page displays the alers generated by Domibus in case of unusual behaviour of the application. The alerts are configured by the administrator.
Test Service
On this page the administrator can perform basic tests of communication configurations between two access points.
Logout
To logout from the Administration Console, click on the Logout button available at the top right hand corner of the screen menu.

Filtering
The Administration Console provides a filtering functionality. To activate the filters, click on the Advanced button at the top of the screen, to deactivate them, click on Basic:

Sorting on column
Click on any column header to sort on the the chosen column (Message Id, From Party Id, To Party Id, Message Status etc..)
By default, messages are sorted by Message Id, with the most recent message at the top.

Adaptable Columns
Show/Hide columns
The user can adapt the Administration Console screens to display or hide one or more columns.
Click on Show Columns/Hide Columns at the top right hand of the screen to see the list of available columns, then check/uncheck the boxes next to the column header names to choose which columns needs displaying or not:

Moving columns on the Administration Console screens
Columns on the Administration Console screens can be moved left hand or right hand by simply dragging-and-dropping the column header from one place to another.
Note that any changes made in the Administration Console screens are not saved if you logout or refresh the screens.
Number of displayed rows
The number of rows displayed on the Administration Console can be changed by clicking on the drop down arrow Rows menu located on the upper left hand part of the screen (default is 10):

Export tables as CSV files
Users can export the content of the Console Admin user interface table into a .csv file by clicking on the Export CSV button on the upper left hand corner of the table:

Messages
By default, the Messages screen is displayed after a successful login to the Administration Console. Details of messages are displayed on the screen, such as Message ID, From Party Id, To Party Id, Message Status etc.
Use the filtering functionality described above to find a specific message.
To display details of a message, double-click on it:

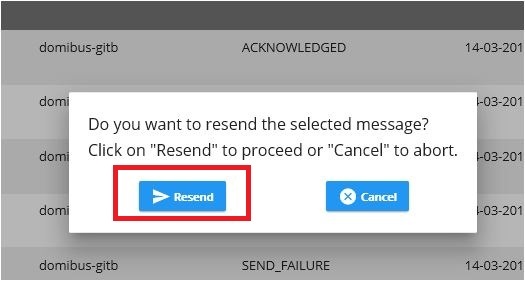
Resending messages
On the Messages screen you can resend messages. Select the message and click on the Resend button located on the bottom left hand side of the screen:

You can also click on the Action arrow on the right hand side of the message line and then on Resend:

Downloading messages
Select the message and click on the Download button located on the bottom left hand side of the screen or click on the Action arrow and then on Download (as a a zip file):

Message Filter
On the Message Filter screen, you can define how messages are routed once they have been received. The available options depend on the plugins that have been installed.
The two most common ones are the WebServices plugin and the JMS plugin.
To create a new message filter, click on the New button, fill in the message filter criteria and save by clicking on the OK button:

You can also define the order in which the messages are processed if more than one plugin is installed.
Create a new message filter with a new selection criteria (as described previously) and then move it up or down as required.
Use the Move up button or up arrow on the filter entry, as shown in the image below:

Error Log
The Error Log screen lists application errors. Filters can be applied to display the errors while defining which columns should be displayed or hidden.

PMode
PMode - Current
The current different domain PModes can be viewed or modified (edit).
Save to keep or Cancel the changes as required:

Download/Upload PMode file
You can upload/download your PMode by clicking on the Upload/Download button at the bottom of the page. Then click on choose file to navigate to the location of the PMode file you want to upload/download.
PMode - Archive
The history of the PMode changes is displayed in the Archive section of the Administration console:

Domibus keeps a snapshot of the Pmode each time the PMode is modified. Under Actions, the user can delete, download or restore a particular version. When restoring a specific PMode version, the user makes that version the current PMode:

PMode - Parties
Under Parties, the user can manage the parties in the PMode. Parties can be searched using filter criteria, they can be added, updated or deleted. Each time a party is added, updated or deleted, a new PMode snapshot is made and saved under Archive.

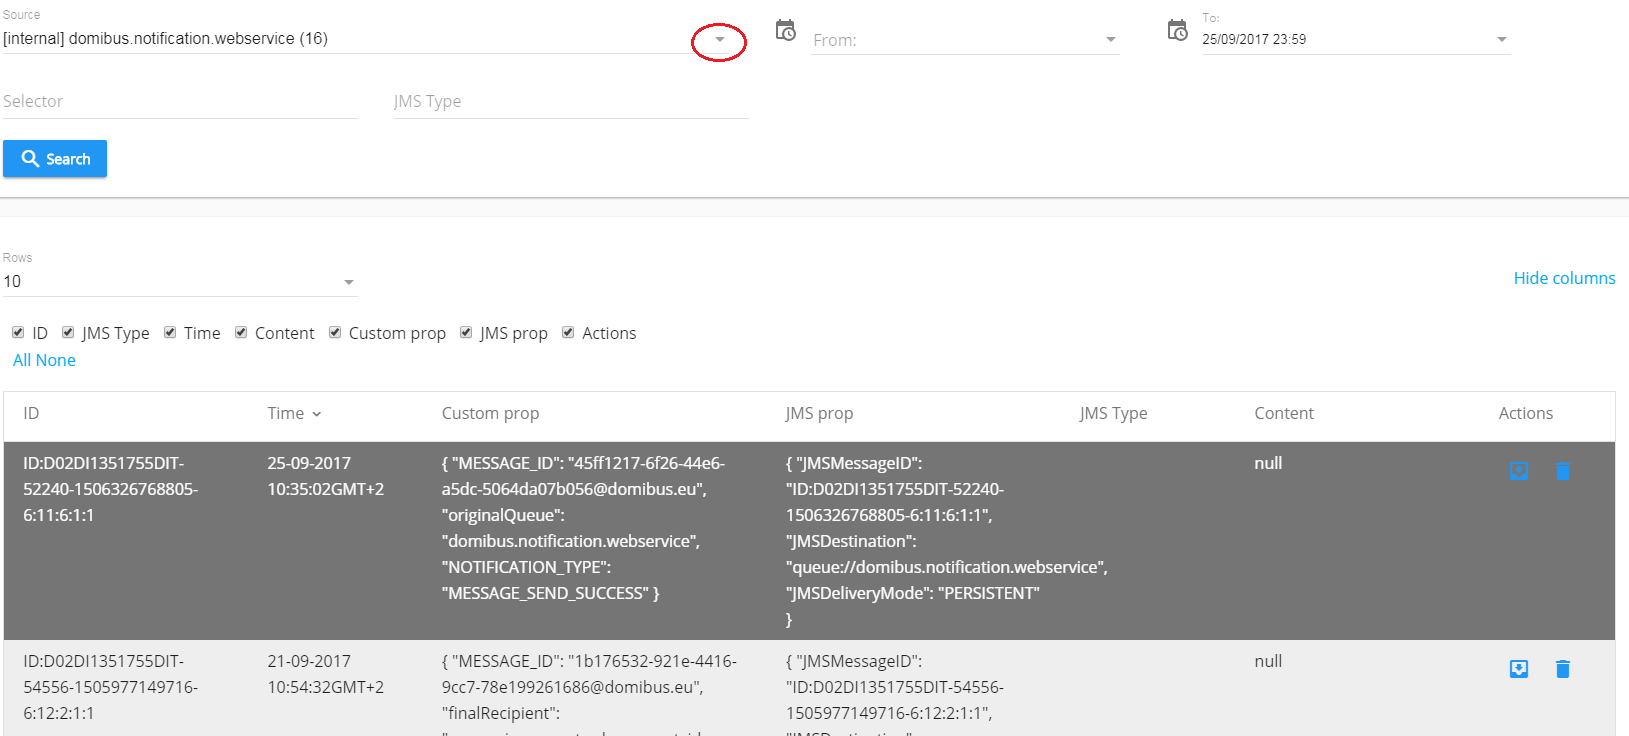
JMS Monitoring
In the JMS Monitoring page you can view, monitor, manage and navigate through the content of JMS queues.
All queues and their contents are viewable. You can change the default queue by clicking on the drop-down arrow, below Source:
Messages in the JMS queues can also be deleted or moved to another queue. Note that these actions take effect immediately and cannot be undone.
Delete Messages in a queue
To delete a message, select the message and click either on the BIN icon on right hand side of the message, or click on the Delete button at the bottom of the page:

Move messages from on queue to another
To move a message, select the message and click either on the Move icon on right hand side of the message, or click on the Move button at the bottom of the page:

Truststore
In the Truststore screen, you can manage the trusted certificates. You can upload a new truststore to replace the current one and define its password.
Upload New Truststore Certificates
To upload a new Truststore, click on the Upload button and navigate to the location of the file with pop up menu, enter truststore password and click on OK:

Users
On the Users screen, you can create and manage users:

Export list of users
You can export the list of current users with their status into a .csv file by clicking on the Export csv button at the top of the page:

Add a new user
To add a new user, click on the New button at the bottom of the page, fill in the pop-up box with the required values (username, email address, password etc.) and click on the OK button:

Edit a user
To edit a user, select the user, click on the Edit button at the bottom of the page or click on the Edit icon in the Actions column. Make the necessary changes in the pop-up box (username, email address, password etc) and click on the OK button to save your changes.

Delete a user
To delete a user, click on the Delete button at the bottom of the page or select the message to be deleted and click on the Bin icon in the Actions column.
Click on the OK button to delete the user.

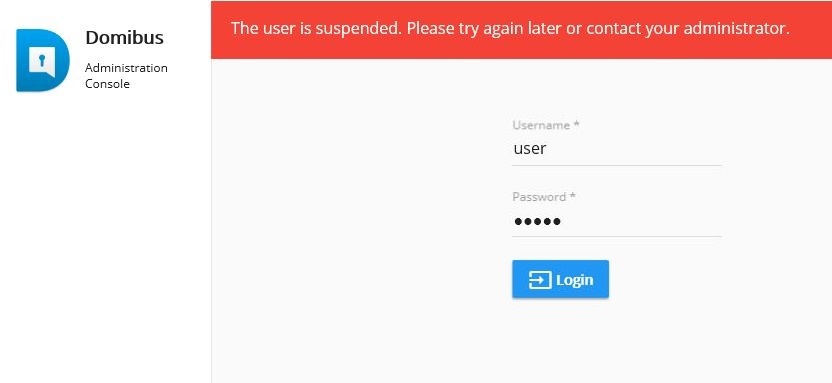
Account Lockout procedure:
A user account lockout policy has been implemented on Domibus Admin Console. By default, if a user tries to log to the Admin Console with a wrong password 5 times in a row, his account will be suspended (locked):
You can define in the domibus.properties file the number of failed attempts after which a user’s account will be locked.
By default, a user remains suspended during one hour before his account is automatically unlocked and the user can try to log again.
If the user wants his account to be unlocked without waiting the default one hour, he can ask his administrator to unlock the account. To unlock the account, the administrator must change the user’s status on the Admin Console from Suspended to Active.
Select the suspended user and click on Edit:

Re-activate the user (unlock it) by checking the Active status and confirm with OK:

IMPORTANT: Save the changes by clicking on Save on the next window and then on Yes to confirm the change.
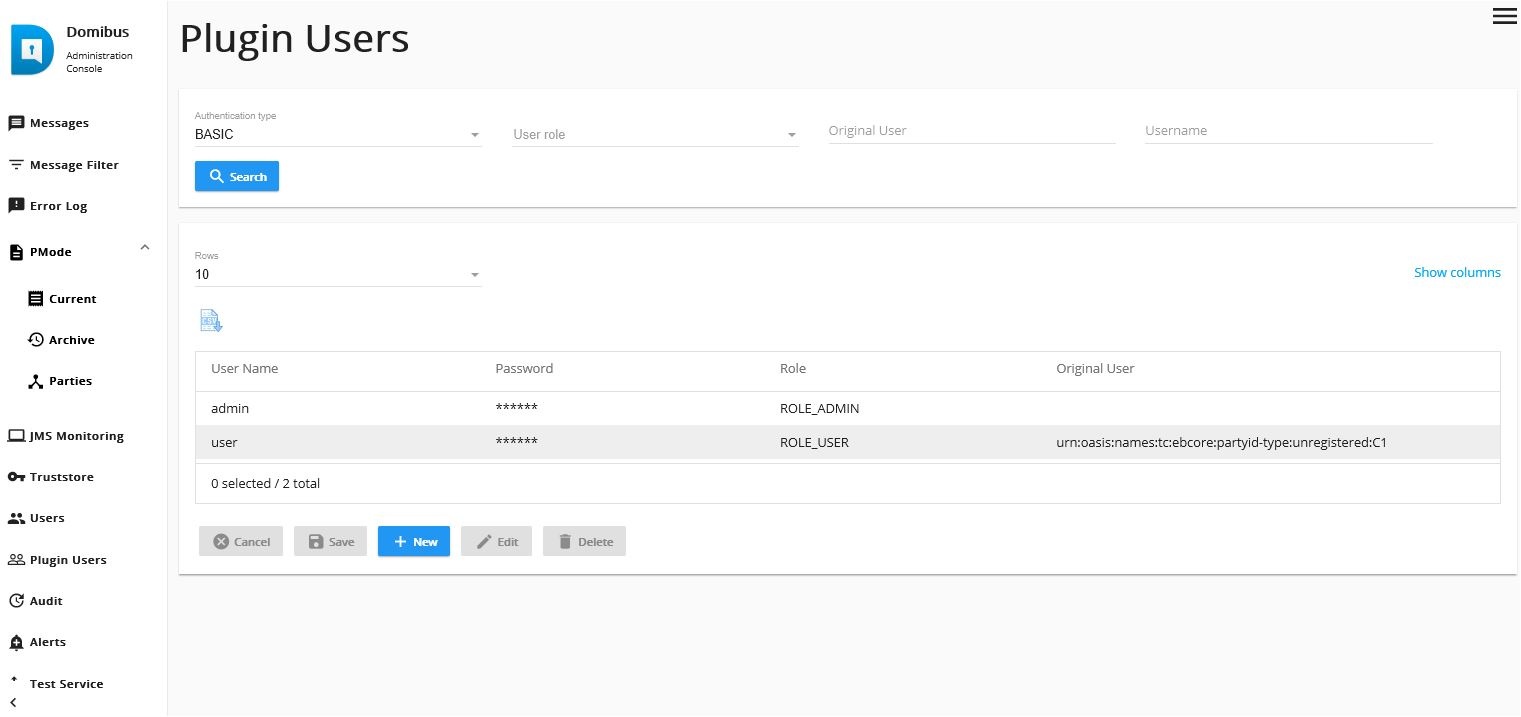
Plugin Users
In Multitenancy mode the plugins security is activated by default, no matter if the value is configured in domibus.properties for the domibus.auth.unsecureLoginAllowed property.
This is needed in order to identify the request performed by the user and associate it to a specific domain. As a result, every request sent to Domibus needs to be authenticated.
A plugin must use a configured plugin user associated to a specific domain in order to authenticate every request sent to Domibus.
The management of the plugin users is done via the the Plugin Users page:
Audit
Domibus keeps track of changes performed in the PMode, the Parties, the Message Filter and the Users pages. This is what is displayed on the Audit screen:
Alerts
In Domibus you can define alerts by using different available media to notify the Domibus administrator in case of unusual behaviour. Those notifications are presented to the Domibus administrator under the form of configurable alerts.
The alerts can be browsed in the Domibus Admin Console and received by email.
Three alert types are available : Message status change, authentication issues and certificate expiration.
In the column Processed, the user can check/uncheck alerts:

Test Service
On the Test Service page of the administration console you can inspect and send Test messages to other Access Points.
Information on both messages are available. Every time “Receiver Party Id” changes, you are able to check the updated information of Last Sent and Last Received Test Messages.

Domibus v4.0.1
Description
We are happy to announce the bug fix release of the production-ready Domibus 4.0.1 sample implementation of the eDelivery Access Point.
Domibus 4.0.1 version includes a number of bug fixes and a couple of improvements concerning:
Add possibility to exclude a protocol from the CRL list
WebLogic cluster: fixed the PMode and truststore refresh with the WebLogic cluster
Fixed submitting of messages via the Default JMS Plugin in Multitenancy mode
Improved logging for Multitenancy
Add email alert support for super user login failure and account disabled
Fix the retry issue for restored messages
Increase to 5 minutes the transaction timeout of ListPendingMessages operation in the Default WS Plugin
Add configurable property for AS4 transport profile in the dynamic discovery process
Fixed the Peppol dynamic discovery
Allow empty "ConversationID" in the message sent by C1
Support ofr LDAP CRLs
Fix the Unique Particle Attribution violations in the Default WS Plugin
Domibus 4.0.1 is backwards compatible with 4.0 and 3.3.x and the upgrade is not mandatory.
Documentation
Quick Start Guide (pdf) | This guide allows the user to quickly get started with Domibus. After completing this document, you will have a local Domibus instance up and running locally on a Tomcat/MySQL environment. |
Testing guide (pdf) | This document is intended for developers that want to perform a set of checks on their Domibus installation and testers that want to have a starting point to create their own test cases. |
Interface Control Document of the default JMS (pdf) | The purpose of this document is to outline the JMS Data Format Exchange to be used as part of the default JMS backend plugin. |
Interface Control Document of the default WS plugin (pdf) | This document describes the WSDL and the observable behaviour of the interface provided in the default WS plugin. |
Interface Control Document of the File System plugin (pdf) | The purpose of this document is to outline the file system messages exchange as part of the default File System (FS) backend integration solution for the Domibus Access Point. |
Administration Guide (pdf) | The purpose of this guide is to provide detailed information on how to deploy and configure Domibus on WebLogic, Tomcat and WildFly with MySQL and Oracle. It also provides detailed descriptions of related Security Configurations (Policies, Certificates, TLS Configuration), Message Filtering, PMode Configuration, Application Monitoring, Registration of custom plugins and Troubleshooting. |
File System Plugin Administration Guide (pdf) | The purpose of this guide is to provide detailed information on how to configure and deploy the File System Plugin available in Domibus 3.3 and later versions. |
Plugin cookbook (implementation manual) (pdf) | After reading this document the reader should be aware of the capabilities provided by the Domibus plugin system. Additionally a developer familiar with the AS4 protocol will be able to implement a plugin integrating an existing back office application into Domibus. |
Domibus Software Architecture Document (pdf) | This document provides a comprehensive architectural overview of the system, using a number of different architectural views to depict individual aspects of the system. It is intended to capture and convey the significant architectural decisions that have been made on the system. |
REST services documentation | Documentation on the REST services. |
Licence (pdf) | European Union Public Licence. |
Migration from 4.0 to 4.0.1
In order to upgrade to Domibus 4.0.1 it is necessary to run the SQL migration script, which depends on the DB vendor used. For Multitenancy mode, please use the provided SQL script to update the general database schema.
Afterwards please update the domibus.properties file, install the domibus.war and replace the plugin(s) jar(s) into \domibus\conf\domibus\plugins\lib".
For a more detailed description of the Domibus upgrade procedure click here.
Release note
Please find below the list of improvements and fixed bugs.
Fixed Bugs
[EDELIVERY-3768] - Alerts management for super users
[EDELIVERY-3921] - JTA transaction timeout for more than 7900 messages in the pending messages queue
[EDELIVERY-3926] - PMode and Truststore update not working properly on a WebLogic cluster
[EDELIVERY-3930] - SQL script error on MySQL 5.6 and lower
[EDELIVERY-3938] - Fix - Segregate the Domibus logs per domain
[EDELIVERY-3940] - Messages are not displayed when originalSender and finalRecipient are not present in the message
[EDELIVERY-3942] - Allow empty "ConversationID" in the message sent by C1
[EDELIVERY-3953] - Message stuck in WAITING_FOR_RETRY state
[EDELIVERY-3983] - Imminent certificate alert send on each job execution
[EDELIVERY-3984] - RetrieveMessage displays the full file path of payload in PartInfo
[EDELIVERY-3988] - Alert stuck in SEND_ENQUEUED state
[EDELIVERY-4032] - Tomcat with Oracle DB: Default JMS Plugin is not working in multi-tenancy
[EDELIVERY-4058] - Possibility to exclude a protocol from the CRL list
[EDELIVERY-4061] - Unable to change log level on a specific tenant
[EDELIVERY-4081] - Delete-db and multi-tenancy-rights are not present in the distribution
[EDELIVERY-4119] - Binary token missused when validating sender certificate
[EDELIVERY-4123] - Transport profile should be configurable for the dynamic discovery peppol client
[EDELIVERY-4136] - Alerts emails sending fails with "invalid email address configured for the alert module" errors
[EDELIVERY-4173] - Fixed the parsing of service and action values in case of Peppol dynamic discovery
Tasks
[EDELIVERY-3925] - More information on Alerts email
Known issues and limitations
[EDELIVERY-2608] - Unable to use Admin Console in IE (not EDGE)
[EDELIVERY-3210] - Max retry limit may be exceeded on Wildfly 9
[EDELIVERY-3335] - Messages page: performance decrease when certain filters are applied on millions of messages
[EDELIVERY-3575] - UI admin console: user is logged out when logging-in in another tab
[EDELIVERY-3634] - Issue starting Tomcat/WildFly cluster the first time with an empty MySQL schema
For more information, please contact us via our portal or by e-mail: CEF-EDELIVERY-SUPPORT@ec.europa.eu